Category Archives: Policy

Improving Presence Privacy in Lync 2010

An update was recently released that addresses a few niche privacy scenarios in Lync 2010. Even though presence is really what makes Lync amazing and enables so many innovative ways to communicate, this additional insight can cross the line and impact work/life balance. To address this, Microsoft has released a patch to remove the LastActive attribute from the presence aggregation category.

This update will be handy for organisations that are approaching presence functionality with caution or have strict rules around how much information a user makes available to the rest of the organisation. Particularly, it will be useful for companies that operate in countries where it’s illegal to monitor employee’s activity.

A bit more from the Microsoft description of this update:

The Lync Server 2010 presence scheme includes a method for calculating and displaying how long a user has been away or offline. This is known as “Last Active.” The LastActive attribute returns presence inquiries only from users who have the “Colleagues,” “Workgroup,” and “Friends and Family” privacy relationships.

Lync Server 2010 always calculates the Last Active time stamp during presence aggregation for each user and stores it in a database. Last Active presence information is retrieved to satisfy individual presence inquiries and subscriptions by other users. This occurs according to the access level that the users were assigned. The design of the Last Active presence information has changed for the following reasons:

  • Last Active presence information may be incorrectly interpreted as reflecting the actual user’s status at work. Therefore, users may rely on it to remotely monitor an employee’s activity. However, this behavior is not allowed in some countries.
  • Last Active presence information that is provided to users should not disclose how long a user is away or offline for business reasons.

Note The aggregate presence data that is calculated by Lync Server 2010 contains the status history of each user’s endpoints if a user is signed to multiple endpoints. The status of each endpoint changes automatically in response to system events (such as logon, logoff, workstation lock and unlock, and network connectivity events), configured timeouts, scheduled meetings, and user activity. The status of each endpoint can also be changed manually by the user. In this situation, Last Active presence information cannot be considered as an accurate measure of the user’s presence. Instead, Last Active presence information is intended to provide additional information about the user’s availability and willingness to communicate.

So as you can see, this patch has basically been released for companies that may have gone a bit too far with presence and how they are tracking their staff. If you don’t keep a handle on this, you could find a rift created between managers and their employees. Imagine this scenario:

Manager: “I saw that your presence in Lync was set to away for 7.5 minutes at 11:35am, what were you doing then?!”
Employee: “Uhh, I was in the bathroom?!”

Really what you want to do is strike a balance between personal accountability and trust when using presence. Don’t let your managers go all “big brother” on your staff to the point where they are nervous to walk away from their computer.

You can check out more about the update here on the Microsoft Support site.
How does Lync 2010 use Exchange calendar information?

I’ve had a few questions come up lately around when Lync 2010 polls Exchange for free/busy information and how/when presence state is updated based on your calendar. I did a bit of digging into it and think I’ve worked a few things out that make the whole situation a bit clearer.

There are two things to consider here. We need to look at how often Lync polls Exchange for the free/busy information, and then how often your calendar state is published to your Lync presence i.e. you change from Available to In a Meeting based on the free/busy data that was retrieved from Exchange.

How is it controlled?

Everything we need to look at here is defined in a Lync Client Policy and there are two parameters that you need to specify interval durations for – either WebServicePollInterval (if you’re using Exchange Server 2007/2010) or MAPIPollInterval (if you’re using Exchange Server 2003) and CalendarStatePublicationInterval. I’ll go into more detail on each of these below.

Lync determines when to change your presence from for example, Available to In a Meeting with this data. This means that if you create an appointment in Outlook in-between when Lync polls Exchange and when Lync applies your calendar state to presence, this won’t be reflected in Lync until the polling interval lapses and Lync retrieve the Free/Busy info from Exchange again.

Retrieving Calendar Data from Exchange

So firstly, we need to look at how calendar data (free/busy information) is retrieved from Exchange Server by Lync.

Exchange Server 2003

If you’re (still) using Exchange Server 2003, Lync will poll the server via a MAPI RPC call for free/busy information. This is controlled in the Lync Client Policy using the parameter MAPIPollInterval.

The default is 30 minutes but this can be changed to anything from 5 minutes to 480 minutes (5 hours). So to set it to 5 minutes, the cmdlet would be Set-CsClientPolicy -MAPIPollInterval 00:05:00.

Exchange Server 2007/2010

Update 28th Jan 2013: Amended to explain that Lync connects to the Exchange Autodiscover service first before being directed to the EWS URL, thanks Marcin Swiatelski. 🙂

For those using Exchange Server 2007 or 2010, Lync will be connecting to your Exchange Autodiscover Service URL and then onto your Web Services URL for free/busy information rather than the local MAPI profile in Outlook.

It builds this Autodiscover URL based on your SIP address, and not by anything you configure in Exchange or from the AD Service Connection Point. So if my SIP address is me@justin-morris.net, the two URLs Lync will attempt to connect on will either be:

https://autodiscover.justin-morris.net/autodiscover/autodiscover.xml or
https://justin-morris.net/autodiscover/autodiscover.xml.

For Lync to connect to the Exchange Autodiscover service, you need one of these URLs to be accessible.

Typically the autodiscover.sipdomain.com option is the most commonly deployed, as this compliments what is already usually deployed for Outlook 2010 to work.

Once Lync has connected to the Exchange Autodiscover service, it will receive EWS URLs to connect to e.g. https://autodiscover.justin-morris.net/EWS/Exchange.asmx or https://justin-morris.net/EWS/Exchange.asmx

The interval in which Lync connects to EWS to poll for free/busy information is controlled in the Client Policy using the parameter WebServicePollInterval. The default is 30 minutes but this can be changed to anything from 5 minutes to 480 minutes (5 hours). So to set it to 5 minutes, the cmdlet would be Set-CsClientPolicy -WebServicePollInterval 00:05:00.

Publishing Calendar Data to Presence

So now once we’ve retrieved that calendar data from Exchange, Lync needs to actually apply it to your presence, and how often this occurs is controlled by the CalendarStatePublicationInterval parameter in the Lync Client Policy.

Unlike the MAPIPollInterval and WebServicePollInterval parameters, the CalendarStatePublicationInterval parameter must be set in number of seconds.
So to set it to 5 minutes, the cmdlet would be Set-CsClientPolicy -CalendarStatePublicationInterval 300. 

Polling and Publication

My understanding from perusing TechNet library articles is that there is a difference between Polling and Publication of calendar information in the Lync client.

I could have interpreted this incorrectly, but I’m pretty sure this is the way calendar information is handled by Lync. If anyone can shed additional light, please let me know in the comments.

TechNet Library References:

Set-CsClientPolicy
http://technet.microsoft.com/en-us/library/gg398300.aspx

Migrating User Settings to Lync Server 2010
http://technet.microsoft.com/en-us/library/gg398814.aspx

Demystifying Photos in Lync

I came across a post on the TechNet forums recently where someone was asking a lot of questions about how photos are implemented and managed in Lync. Given that there aren’t many examples around of the behaviour, I thought it was worthwhile writing this up and including some screenshots.

How are photos controlled?

All control over how photos are displayed in Lync is done via a client policy. You can control this part of a policy either by modifying the default global client policy or by creating a new client policy and assigning this to the users you want the control of pictures to apply to.

Determining what is currently configured

To find out what control of photos a policy is applying, you can run Get-CsClientPolicy to retrieve all the current configuration of a client policy. The configuration item you’re looking for is DisplayPhoto.

How do we implement this?

For this post, I’ll assume we have an existing policy called PhotosControl that we’re going to modify to achieve this. You could either modify the existing Global client policy, or create a new one using the New-CsClientPolicy cmdlet.

We’ll be using the following Lync Server Management Shell cmdlets to demonstrate this:

Set-CsClientPolicy – This will allow us to change the configuration of the client policy.
Grant-CsClientPolicy – This will allow us to assign the client policy to a user or group of users.

There are three configurable options in a Lync client policy that control how photos are displayed, and these are defined as variables of the -DisplayPhoto switch.

Allowing any photo to be shown in Lync

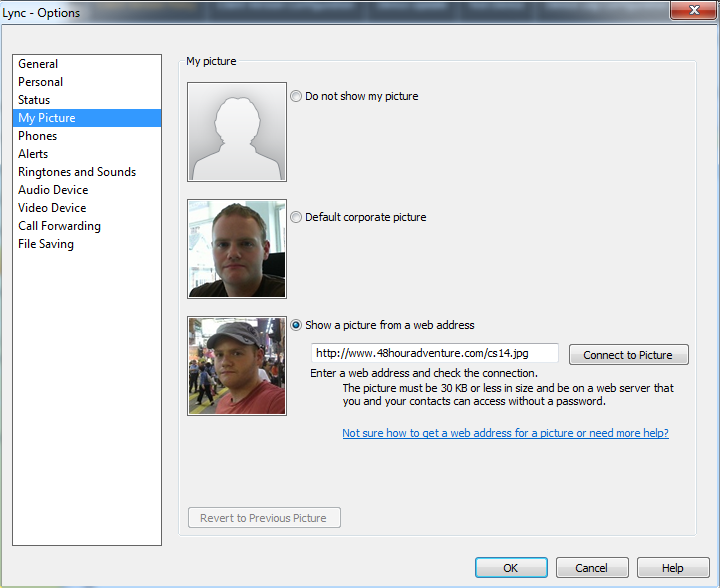
This setting will allow the user to either specify a URL, use the AD or SharePoint stored photo, or turn off photos altogether as illustrated below.

Set-CsClientPolicy -Identity PhotosControl -DisplayPhoto AllPhotos

This configures the client policy called PhotosControl to allow the user to display any photo in Lync (by specifying a URL, using the corporate photo, or displaying no photo at all).

To assign this to a user, we run Grant-CsClientPolicy -Identity sip:justin.morris@justin-morris.net -PolicyName PhotosControl

The results on the client endpoint are shown below.

When we open up Options in Lync, this is what we see. The user has the option to show a picture from a web address they input, the default corporate picture from AD/SharePoint, or no picture at all.

Showing photos from Active Directory only in Lync

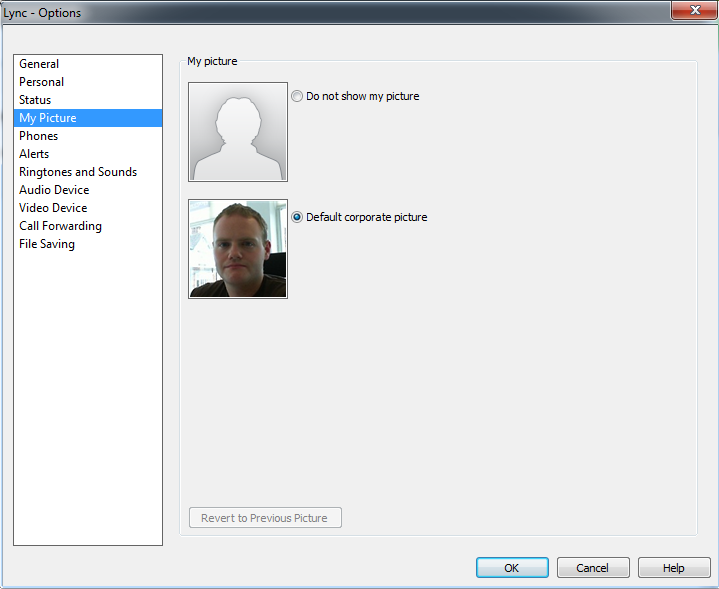
This setting will display the AD or SharePoint stored photo, but will also give the user the option to turn off photos altogether as illustrated below.

The cmdlet syntax for this as as follows:

Set-CsClientPolicy -Identity PhotosControl -DisplayPhoto PhotosFromADOnly

Now, we already assigned the policy to a user in the last section, so all we need to do is sign out and sign back into Lync to see what the resultative behaviour is.

When we open up Options on Lync, here’s what we see. The user only has the option to show the default corporate picture from AD/SharePoint or no picture at all.

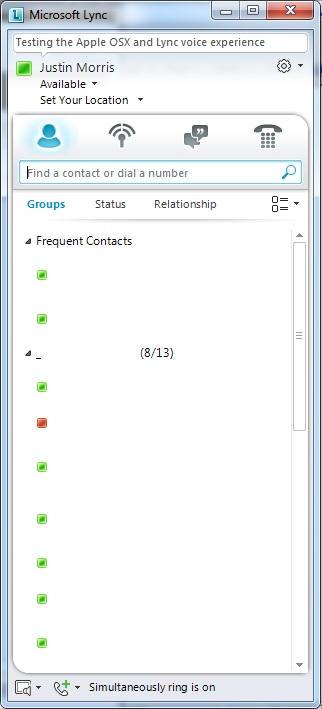
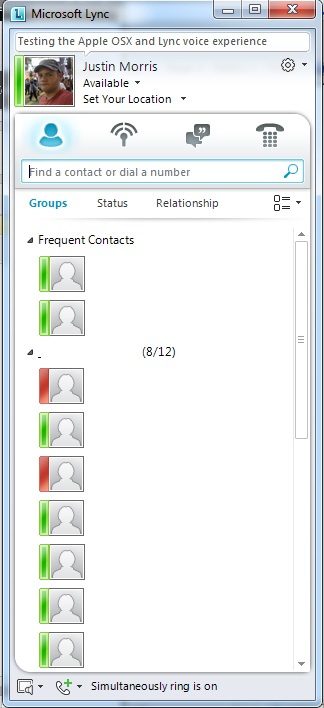
And this is reflected on the main UI of Lync accordingly.

Disabling photos completely in Lync

This setting will display no photo at all and Lync will drop back to only displaying the small, square presence icons. To other users, they will see no photo of you on their contact list.

The cmdlet syntax for this as as follows:

Set-CsClientPolicy -Identity PhotosControl -DisplayPhoto NoPhoto

Now, we already assigned the policy to a user in the last section, so all we need to do is sign out and sign back into Lync to see what the resultative behaviour is.

The results in the main Lync client UI look like this:

Very similar to what things looked like in Office Communicator 2007 R2. Great for when you want to deploy Lync but don’t want the UI look and feel to disrupt users too much.

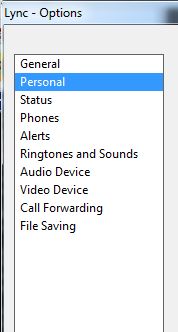
And if we open up Options, we see that the My Picture tab is completely gone and we can’t change anything.

Conclusion

As you can see, there is a very granular level of control over how photos are presented in Lync. Using the cmdlets above you can mix and match as to which users can and can’t display photos and whether they can display any photo they like or only what you’ve imported into AD/SharePoint.

Hope this helps you determine how you’ll deploy photos and as always, any questions/comments below.

Excluding local intranet hyperlinks when configuring URL filtering for Microsoft Lync Server 2010

Recently I needed to setup URL filtering on Lync Server for a project. Pretty simple task you’d think, but I needed to exclude local intranet hyperlinks from being blocked as well. I found out that this is much easier said than done in Lync.

The Problem

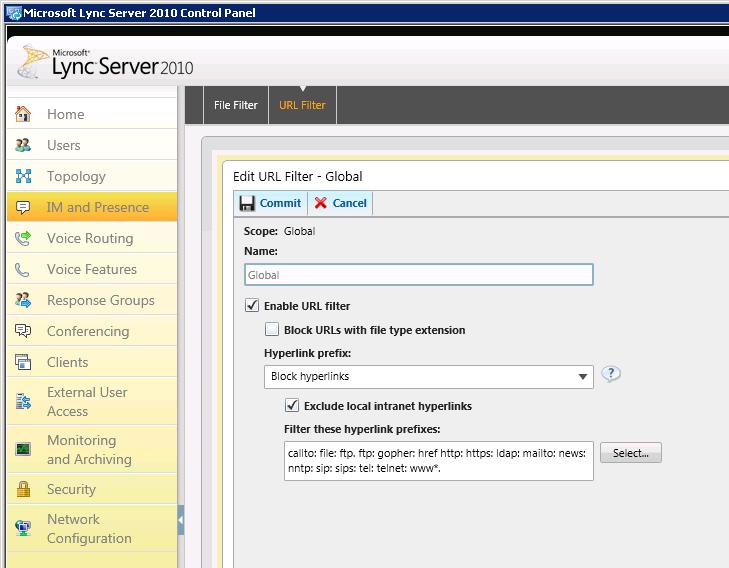
Everything exists in the Lync Server Control Panel for this, and there is advice here on TechNet to configure it, but it’s very vague and only scratches the surface as to what is actually required. To get this working, you need to add the URLs you want to exclude to the Local Intranet Sites zone on each Front End Server, as per TechNet.

URL filtering in Lync Server 2010

The URL Filter page in the Lync Server 2010 Control Panel

Sounds easy enough right? Wrong. Because the Lync Front End Server service now runs under the Network Service account, you can’t just open up your Internet Options and pop them in there, you need to open Internet Options as the Network Service account.

Usually to execute an application under a different account, you can use the runas command, which would look like this:

runas /user:”NT Authority\Network Service” “C:\Program Files\Internet Explorer\iexplore.exe”

This doesn’t work properly though, because you’re prompted for the Network Service password, which we don’t know (because this is a system account). The way around this then, is using the PsExec tool from SysInternals. The process to point you in the right direction for doing this is detailed here by Ben Parker (hat tip to Paul Nearney, a fellow Modality rockstar for bring this to my attention).

So using PsExec, the command we want to run is:

psexec -i -u “NT Authority\Network Service” “C:\Program Files\Internet Explorer\iexplore.exe”

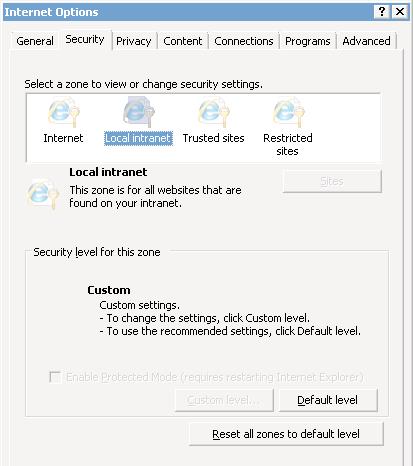
This then fires up Internet Explorer for us, but we’re greeted with this when we open Internet Options:
internet options when opened using Network Service account

The Internet Options dialog when executed under the Network Service account

Pretty useless really, because we can’t change anything! We can’t click on Sites to add the URLs we want to exclude, so we’re stuck. This is where I escalated this problem to Microsoft.

The Workaround

I engaged Microsoft PSS and after some investigation and reproduction of the issue, the engineer (thanks to Debasis Mishra) and the Lync Product Group identified this as a bug and came back with a workaround.

To get this working today, we need to do a bit of registry hacking to add local intranet URLs manually to the Local Intranet zone:
The Network Service like all AD objects has a SID and that is unique and common across all. The SID of Network Service account is S-1-5-20.

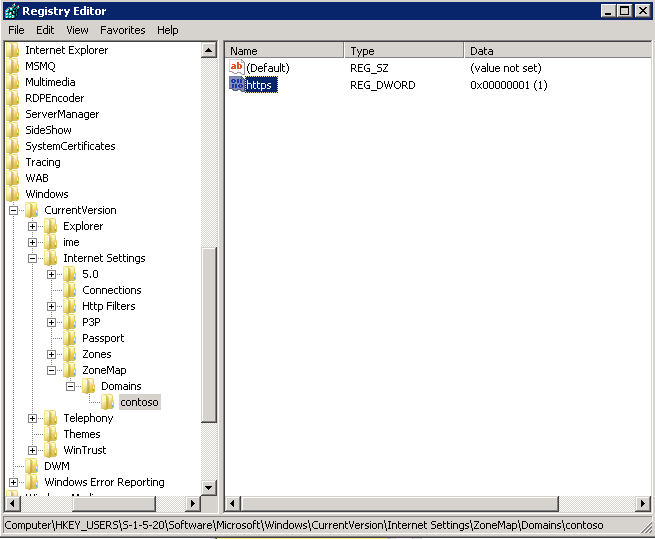
  1. Launch the registry on the Lync Front End server and browse to HKEY_USERS\S-1-5-20\Software\Microsoft\Windows\CurrentVersion\Internet Settings\ZoneMap\Domains (in case you don’t find ZoneMap and Domains, create new keys with these names in the Internet Settings key).
  2. From here, we can add the first Intranet site which is, let’s say for example http://contoso.com.
  3. Under Domains, create a new key and name it contoso.com.
  4. Next, create a DWORD with name http and set the value to 1. You can do the same for https if you need this.
  5. Similarly for a second site, create a key and name it contoso.local for example.
  6. Here you need to create DWORD(s) for each protocol you want to allow. Let’s say one with the name https and the other with the name ftp. Set the value to 1 for both.

    Excluding local intranet URLs from filtering in the Windows registry

    Excluding local intranet URLs from filtering in the Windows registry

  7. Once done, restart the FE service and you should now be able to send IMs with the intranet URLs you’ve specified e.g. http://www.contoso.com

And there you have it, that’s how you do it my friends. A bit convoluted right now and messy, but it get’s the job done. Hopefully a hotfix will be released in an upcoming Cumulative Update and the documentation will be updated.

Let me know if you have any problems with it in the comments section below.