Category Archives: Server

Rolling Back Schema Preparation for Lync Server 2010

A lot of requests have come up in the past both on the Microsoft TechNet forums and during previous engagements around how to mitigate the risks involved in extending the AD schema for Lync Server 2010.

There are rollback processes that come with Lync Server 2010 to remove the forest and domain level changes, but once you’ve done the schema level change, there’s no way of rolling back the changes using the Lync Server 2010 tools.

For a lot of IT teams, this will be acceptable as there is inherent faith in Microsoft’s ability to extend its own schema.
However, if your AD environment is heavily regulated by IT governance and your change control guidelines require a back out process for each change, there is a way to provide this. I’ll outline each step below.

Isolating the Schema Master from AD

To provide a back out plan for this change, the following risk mitigation prerequisite steps must be carried out prior to running the actual AD schema preparation step:

  1. Log on to the domain controller that holds the Schema Master FSMO role.
  2. Temporarily suspend AD replication capability from the domain controller using the following step
    1. From a Command Prompt, run:
      repadmin /options +DISABLE_OUTBOUND_REPL

This process will suspend outbound AD replication from this domain controller, meaning changes we make won’t replicate to all of AD. Alternatively, you can disable the NIC of the machine, or disconnect it completely if it is a physical machine to achieve the same outcome.

Running Schema Preparation

To prepare schema for Lync, log onto the domain controller that holds the Schema Master FSMO role. You can then prepare the schema using either the Lync Server 2010 Deployment Wizard or the Lync Server 2010 Management Shell.

I’m not going to republish what is already documented, so here are the Microsoft TechNet library articles for performing the Schema Preparation step using both methods mentioned above:

Using Setup to Run Schema Preparation

Using Cmdlets to Run Schema Preparation

To prepare schema of the forest, you must be using an account with Schema Admins group membership.

Verifying Schema Preparation Completed Successfully

From the previously linked TechNet article:

  1. Log on to a domain controller as a member of the Enterprise Admins group.
  2. Open ADSI Edit by running adsiedit.msc from the Run command.
  3. On the Action menu, click Connect to.
  4. In the Connection Settings dialog box under Select a well known Naming Context, select Schema, and then click OK.
  5. Under the schema container, search for CN=ms-RTC-SIP-SchemaVersion. If this object exists, and the value of the rangeUpper attribute is 1100 and the value of the rangeLower attribute is 14, then the schema was successfully updated. If this object does not exist or the values of the rangeUpper and rangeLower attributes are not as specified, then the schema was not modified.

Reintroducing the Schema Master to AD

Once you’ve verified that the AD schema preparation was successful, you can roll back the risk mitigation prerequisite by completing the following steps:

  1. Log on to the domain controller in the domain that holds the Schema Master FSMO role.
  2. From a Command Prompt, run:
    repadmin /options -DISABLE_OUTBOUND_REPL.

If you chose the option to disable/disconnect the NIC, you can reconnect/re-enable this now.

From here, you can carry out the AD Forest and Domain preparation steps for Lync.

Rolling back if Schema Preparation failed

If the schema preparation step has failed for whatever reason, then replication links or network connectivity SHOULD NOT be restored. The following steps are recommended to be carried out:

  1. The domain controller holding the Schema Master FSMO role must be decommissioned from Active Directory and rebuilt.
  2. The Schema Master role should be seized from the original domain controller and homed on another domain controller in the domain.

If these steps are required, they will not affect normal operational functionality or Active Directory structural integrity e.g. account and service logon.

Proving the roll back worked

Use the following steps to prove that the back out was successful:

  1. On a domain controller within the domain, open ADSIEdit.msc.
  2. Navigate to the following container CN=Services,CN=Configuration,DC=contoso,DC=com.
  3. Verify that the CN=RTC Service container does not exist.

From here, you can troubleshoot why the Lync Schema Preparation failed. Once resolved, you should attempt schema preparation again.

Conclusion

Using this process, you can effectively satisfy change control requirements and make sure your Lync Server 2010 deployment isn’t delayed or hindered.
If you’ve got any questions around this, please feel free to post in the comments section.
Exporting and importing contact lists in Lync Server 2010

I’ve been doing a fair bit of work around coexistence and migration lately and throwing contact lists around all over the place using dbimpexp. In light of this, I thought it’d be a good idea to do up a post to help you understand what dbimpexp.exe is as it’s a super useful bit of kit to have at your disposal during a Lync implementation/migration or during day-to-day operations.

If you’ve had experience backing up or restoring OCS 2007 R2 or Lync Server, chances are you’ll be familiar with dbimpexp. It’s very helpful for moving contact lists in a DR situation or between deployments in different domains. The only constant is that the SIP address must be the same when exporting or importing, so there’s no dependency on the AD domain that the contact lists have been exported from or are being imported into.

What is Dbimpexp?

Essentially (as per Microsoft), it’s a utility for exporting, managing and importing XML files containing homed resource data from a Microsoft Lync Server 2010 SQL database. When they say homed resource data, they mean user contact lists and conference directories. Dbimpexp allows you to import or export users’ contact lists either on a per user basis or a bulk pool-wide basis.

Using dbimpexp.exe

Dbimpexp.exe is located in C:\Program Files\Common Files\Microsoft Lync Server 2010\Support on a Lync Front End Server. You’ll be running it on one of your Enterprise Edition Front End servers or your Standard Edition server to export or import users’ contact lists.

The commands are slightly different for Standard and Enterprise Edition Front Ends, so I’ll cover both in the following sections.

Exporting Contact Lists

So the first thing we want to do is get those contact lists out of one server/pool so we can have them stored to restore in the event of failure, or so we can import them into a new server where the SIP domain is the same. We can export the contact list of an individual or the contact lists of all users on the server/pool.

Standard Edition

For Lync Server Standard Edition, we run the following commands to export users’ contact lists.

For a Single User

This will export out an XML file of the contact list for the single user you specify:

dbimpexp.exe /user:<sip address> /hrxmlfile:”<path that you want to write the xml file to>”

So an example of this would be:
dbimpexp.exe /user:jmorris@justin-morris.net /hrxmlfile:”C:\justin.xml”

For all users homed on the server

This will export out an XML files of all users’ contact lists on the server/pool:

dbimpexp.exe /hrxmlfile:”<path that you want to write the xml file to>”

An example of this would be:
dbimpexp.exe /hrxmlfile:”C:\allusers.xml”

Enterprise Edition

For Lync Server Enterprise Edition, we need to specify the backend SQL instance to connect to that the rtc database resides on. Run the following commands to export users’ contact lists from your Enterprise Edition Front End pool:

For a Single User

This will export out an XML file of the contact list for the single user you specify:

dbimpexp.exe /user:<sip address> /sqlserver:”<SQL Server FQDN\instance name>” /hrxmlfile:”<path that you want to write the xml file to>”

So an example of this would be:
dbimpexp.exe /user:justin@justin-morris.net /sqlserver:”SQL01.justin-morris.net\LYNC” /hrxmlfile:”C:\justin.xml”

For all users homed on the pool

This will export out an XML files of all users’ contact lists on the server/pool:

dbimpexp.exe /sqlserver:”<SQL Server FQDN\instance name>” /hrxmlfile:”<path that you want to write the xml file to>”

So an example of this would be:
dbimpexp.exe /sqlserver:”SQL01.justin-morris.net\LYNC” /hrxmlfile:”C:\justin.xml”

Importing Contact Lists

So now that we’ve exported our contact lists from the source server/pool, we can take the XML files that dbimpexp has created and import the contact lists into the target server/pool.

The only difference between the export and import commands is that to import users, you need to specify the /import switch and the restore type switch of /restype:user (which is different from /restype:all which will attempt to import the conference directories also).

Standard Edition

For Lync Server Standard Edition, we run the following commands to import users’ contact lists.

For a Single User

This will import the contact list from the XML file for the single user you specify:

dbimpexp.exe /import /user:<sip address> /hrxmlfile:”<path where the xml file resides>” /restype:user

So an example of this would be:
dbimpexp.exe /import /user:jmorris@justin-morris.net /hrxmlfile:”C:\justin.xml” /restype:user

For all users homed on the server

This will import all users’ contact lists on the server/pool from the XML file you specify:

dbimpexp.exe /import /hrxmlfile:”<path where the xml file resides>” /restype:user

An example of this would be:
dbimpexp.exe /import /hrxmlfile:”C:\allusers.xml” /restype:user

Enterprise Edition

For Lync Server Enterprise Edition, we run the following commands to import users’ contact lists.

For a Single User

This will import the contact list from the XML file for the single user you specify:

dbimpexp.exe /import /user:<sip address> /sqlserver:”<SQL Server FQDN\instance name>” /hrxmlfile:”<path where the xml file resides>” /restype:user

So an example of this would be:
dbimpexp.exe /import /user:justin@justin-morris.net /sqlserver:”SQL01.justin-morris.net\LYNC” /hrxmlfile:”C:\justin.xml” /restype:user

For all users homed on the pool

This will import all users’ contact lists on the server/pool from the XML file you specify:

dbimpexp.exe /import /sqlserver:”<SQL Server FQDN\instance name>” /hrxmlfile:”<path where the xml file resides>” /restype:user

So an example of this would be:
dbimpexp.exe /sqlserver:”SQL01.justin-morris.net\LYNC” /hrxmlfile:”C:\allusers.xml” /restype:user

Conclusion

So as you can see, it’s a really good tool to have up your sleeve. It’s great for restoring data after you’ve had to do a force move of users or have just rebuilt a new server and have a working Front End ready to go.

If you’ve got any questions about how it works or when you’d need to use it, drop me a comment below.

SQL Database Mirroring with Lync Server 2010 Series – Backend Databases

In the previous part of this series, I talked about how we fail over our databases. In this part, I’ll cover what happens to Lync after the failover.
The objective of this exercise was to attempt to get our Lync Enterprise Edition Pool to function when we took the primary SQL server offline and pointed Lync to the SQL mirror node where our back end databases had been mirrored to.

Trying to get it to work

I found that after failing over, the SQL Native Client on the Front End servers was Database Mirroring aware and had automatically redirected itself to the mirror node of SQL02. This was confirmed when I saw a successful automatic connection to SQL02 on port 1433 from the Front End server (FE03) that we’d failed over to.

However the Lync Server Front End service is not Database Mirroring aware, and we saw loads of errors and warnings in the Lync Server event log telling us that a connection to the SQL server could not be made as it was consistently attempting to connect to SQL01 (the failed server) that is defined in the Lync topology.

When I attempted to sign in using Lync, all we could get was the “Limited Functionality Mode” experience with no presence or contact list.

At this stage, I started to think about how we could get this to work, and changed the DNS record for SQL01 to resolve to the IP address of SQL02, which didn’t help. I even changed the IP address of SQL02 to that of SQL01, which still didn’t result in a successful connection. Everything I tried to get SQL02 to look like SQL01 wouldn’t work.

How to achieve basic client functionality

Now that we’ve discovered that Lync doesn’t support Database Mirroring natively nor do basic DNS changes help, I worked out that we needed to do to get the Lync FE services to start properly and to make a database connection to the SQL mirror node.

  1. Delete the computer account of the principal SQL server (SQL01) from Active Directory.
  2. Modify the hostname of the mirror SQL Server (SQL02) to that of the failed, principal SQL Server (SQL01).
  3. Restart the mirror SQL server and verify that all SQL services are started.
  4. Modify the DNS A record for the failed principal SQL server so that it resolves to the IP address of the mirror SQL server.
  5. Restart the Lync Front End server and confirm that the Front End service is started.
  6. Verify signing in with the Lync client and that you receive the full client experience and not “Limited Functionality Mode”.

As you can see, this is by no means a “High Availability” solution, as it means computer name and AD changes which rules this out as being an acceptable “quick failover” scenario and even rules it out as a Disaster Recovery solution.

Because Lync Server is inherently secure, it means we cannot connect an FE server to a back end SQL server that isn’t defined in the topology.

Why is it not supported?

One reason why it’s not supported is that there is a highly dependent and integrated relationship between the rtc andrtcdyn databases.

Each database refers to the other to maintain a consistent presence state to the user of their contacts, and of their presence to their contacts. The rtc database is mostly static, holding publications of users, contact lists, privacy relationships etc whereas the rtcdyn database is dynamic, holding state about which front end in the pool holds a SIP endpoint and what active subscriptions are bound to the endpoint.

Because database mirroring is configured and managed at an individual database level, in the event of failure OCS/Lync cannot guarantee both databases are in the consistent state required to maintain the required quality user experience.

Summary

To summarise, when the failover process is executed, the following behaviour was observed:

  • Initially, the Lync client signs in but is in “limited functionality mode”. This is because the Lync Front End service cannot communicate with the back-end database.
  • Front End Service starts but events are logged advising that a back-end database connection cannot be made.
  • It was concluded that due to inherent product design, the Lync Front End service will not connect to a SQL server that is not defined in the Lync Topology.
  • It was only after we deleted the computer account for the failed principal SQL server from Active Directory and renamed the mirror SQL server did errors stop appearing in the Application Log and the Lync client function properly.

What about Group Chat?

In the next instalment, I’ll talk more about what happens to Group Chat when we failover the databases to the SQL mirror node. Make sure you subscribe to get updated!

SQL Database Mirroring with Lync Server 2010 Series – Failover

In the first part of this series covering SQL Database Mirroring and Lync Server 2010, I covered a lot of the prerequisites required to establish this deployment scenario. I also ran through getting the Database Mirroring side of things setup.

In this next part, I’ll cover actually simulating a failure of our SQL Server. There are a few T-SQL queries we need to run first, followed by actually failing over the SQL database server node and verifying that the failover was successful.

Failing over to another SQL Server

The failover process was scoped so that it simulated a production data centre failure as close as possible. The process consisted of the following steps for each database mirroring scenario.

Prerequisites to Failover

  1. First, open a Command Prompt and navigate to C:\Program Files\Common Files\Microsoft Lync Server 2010\Support. Run the following command to backup all user data (e.g. contact lists, privacy relationships, conference directories) using dbimpexp.exe:dbimpexp.exe /export /hrxmlfile:location of backup file /sqlserver:name of SQL server /restype:all.
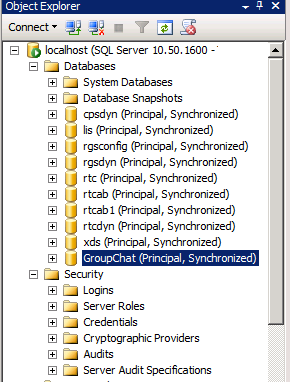
  2. Next, ensure the mirroring status is healthy and that the Principal server node (SQL01) reports each database as Principal, Synchronized:

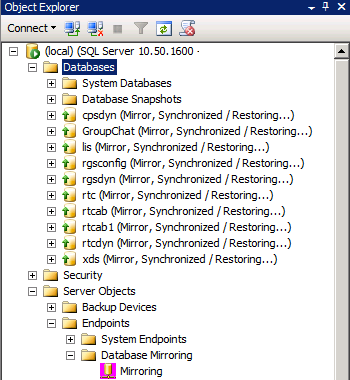
     and that the mirror server node (SQL02) reports each database as Mirrored, Synchronizing:
  3. To track synchronous replication, timestamp tables should be created in each database using the following Transact SQL commands.

CREATE TABLE dbname1.dbo.tblDate (dtDate datetime)
CREATE TABLE dbname2.dbo.tblDate (dtDate datetime)
CREATE TABLE dbname3.dbo.tblDate (dtDate datetime)
CREATE TABLE dbname4.dbo.tblDate (dtDate datetime)
CREATE TABLE dbname5.dbo.tblDate (dtDate datetime)
CREATE TABLE dbname6.dbo.tblDate (dtDate datetime)

  1. Next, run the following command to insert timestamp data into the table every second so replication can be tracked:

SET NOCOUNT ON
WHILE 1 <> 2
BEGIN
INSERT INTO dbname1.dbo.tblDate (dtDate) (select GETDATE())
INSERT INTO dbname2.dbo.tblDate (dtDate) (select GETDATE())
INSERT INTO dbname3.dbo.tblDate (dtDate) (select GETDATE())
INSERT INTO dbname4.dbo.tblDate (dtDate) (select GETDATE())
INSERT INTO dbname5.dbo.tblDate (dtDate) (select GETDATE())
INSERT INTO dbname6.dbo.tblDate (dtDate) (select GETDATE())
WAITFOR DELAY00:00:01
END

In each T-SQL command, replace the field dbname1 with the name of the database you wish to run the command against. Now we’re ready to failover the databases.

Simulating a Server Failure and Failing Over the Databases

You can do this in two ways – either using the Failover button in the Database Mirroring GUI or use the following method to simulate a complete server failure:

  1. Force-power off the Lync Front End and back-end SQL servers, or verify that these servers have failed.
  2. After the decision has been made to activate the disaster recovery process, log onto the SQL Server mirror node (SQL02) and run the following SQL queries to force failover of databases.
    1. Check that the database is in synchronous mirroring mode:
      ALTER DATABASE dbname SET SAFETY FULL;
      GO
    2. Failover the database (this is an unplanned database failover, performed when the Principal is offline, which may result in data loss, hence the command name):
      ALTER DATABASE dbname SET PARTNER FORCE_SERVICE_ALLOW_DATA_LOSS;
      GO

Replace the field dbname with the name of each database.

  1. After failing over the database, verify that the Lync databases are in “Principal, Synchronized” mode on the mirror node (SQL02).

At this point, we can check the Front End (FE) service on our Front End servers and test signing in with the Lync client.

How Lync Server Behaves

In the next instalment, I’ll talk more about what weird behaviour was observed and how I tried to get Lync to use the SQL mirror node. I encountered loads of problems, but eventually got the Lync Front End service to use the SQL server we’d failed the databases over to. Make sure you subscribe to get updated!

SQL Database Mirroring with Lync Server 2010 Series – Prerequisites

I gave you guys a heads up on this a few weeks ago that I’d looked into this in some fairly significant detail and found some interesting behaviour when you attempt to failover after deploying Lync Server 2010 backend and Group Chat databases using SQL Server Database Mirroring. Now that I’ve completed this work, I can share the results with you in a multi-part blog series.

Questions have always been asked over the years as to why organisations can’t use SQL Database Mirroring as a lower cost alternative to SQL Failover Clustering and the only advice we’ve been able to give is what TechNet documentation provides:  “Lync Server 2010 does not support native database mirroring“.

Based on the work I’ve done, I can tell you what happens when you attempt to failover, what you have to do to actually get to a “recovered” situation and reasons why you won’t want to use SQL Database Mirroring with Lync.

The Supported Scenario Today

So today the official supported scenario is to deploy your Lync Server 2010 Enterprise Edition backend and Group Chat databases in one of two ways:
  • On a standalone SQL Server with no resilience.
  • On a highly available SQL Server two node Failover Cluster.
    • This is either for a local, in-site SQL cluster instance for server resiliency only.
    • Or a cross-site, metro data centre SQL clustered instance with one node in each site (and SAN replication, low latency etc) for site resiliency.
The latter solution giving you a resiliency solution with failover you know works for the entire instance.

Why SQL Database Mirroring?

Database mirroring was a new feature delivered as part of SQL Server 2005. The data replication occurs at an individual database level rather than at an instance level in clustering, providing greater flexibility at the expense of a higher management/configuration overhead. Unlike clustering, the system databases e.g. master db cannot be replicated using Database Mirroring. This means that you need to recreate logins, security etc manually on the mirrored node.

The mirroring process transports logs over its own TCP/IP session on port 5022 and uses compression by default. An important point to note is that SQL Server Standard Edition is a single threaded operation whereas SQL Server Enterprise Edition is a multi-threaded mirroring process.

One of the greatest benefits of database mirroring is its flexibility. An example of this is that an administrator can effortlessly switch principal and mirror roles back and forth, failing over between the two nodes. Plus there is no dependency on identical/near-identical hardware, disk, heartbeat networks etc that make traditionally make clustering a hinderance. Think of it like SCR was to Exchange Server 2007.

Compelling Reasons for Database Mirroring

I can definitely see why an organisation would want to utilise mirroring rather than clustering, especially when attempting to design site resiliency. The top reasons being that it is:

  • Cheaper.
  • Represents less infrastructure complexity.
  • Better for site resiliency as there are no tight network and storage requirements. <— No 1 reason.

Test Environment

As part of this investigation, I deployed the following machines to test this configuration:

  • One Lync Server 2010 Enterprise Edition pool consisting of two Front End servers (named FE01 and FE02).
  • Two Lync Server 2010 Group Chat servers (GC01 and GC02).
  • Two SQL Server 2008 R2 servers fulfilling the principal (named SQL01) and mirror (named SQL02) roles for Database Mirroring.

Lync and SQL Configuration

After deploying my servers, I got them ready to define the topology and install Lync. I’m not going to go into loads of detail on the configuration of SQL Database Mirroring here because it’s well covered on TechNet and it’s all GUI driven. I completed the database parts in the following way:

  1. Specified the location for the back end databases for the Front End pool as the principal SQL server (SQL01) in Topology Builder and published.
  2. Setup my Group Chat database and permissions on SQL01 and specified this server in the Group Chat Installation Wizard.
  3. Ensured the Lync backend databases were successfully deployed onto this server.
  4. Verified all sign-in functionality with both the Lync and Group Chat clients.
  5. Configured SQL Database Mirroring using the SQL Server 2008 R2 Management Studio GUI to mirror all databases to SQL02.
  6. Verified that all databases were in a Principal, Synchronized status on SQL01 and Mirrored, Synchronizing on SQL02.

The Next Chapter

Once we’re at this stage, we’re good to start failing the databases over to the mirror node to see how Lync behaves.

Be sure to subscribe and come back for the next part where it gets interesting. Services started failing over the shop, TCP connections were being automagically redirected to the SQL mirror node and there’s lots of the Lync client being in “limited functionality mode”. Stay tuned. 🙂

Configuring Lync Server 2010 for Remote Call Control with Mitel 3300

Remote Call Control on Lync is still a bit of a dark area. Everything in the server product remains in terms of configuring RCC, but getting it going is a bit of a different story. There is very little PBX vendor advice around regarding support of RCC in Lync with their PBXs (although Cisco updated their interoperability statement recently).

Plus there are some shortcomings on the client side that will make or break your RCC deployment. One of the biggest pain points is the complete lack of any video capability when Remote Call Control is configured. This will cause dramas for lots of organisations looking to leverage the desktop video capabilities in Lync. More on this from Jason Sloan.

I’m going to dive straight into the thick of it here and concentrate on getting RCC working with a Mitel 3300 ICP PBX and what vendor specific things you need to do in Lync. I will touch on the PowerShell cmdlets to get RCC going in Lync, but for more generic details on how RCC is configured in Lync, check out these other blog posts.

Infrastructure Requirements

At a high level, here are the basic bits and pieces you’ll need to get this running.

  1. Active Directory.
  2. A functioning Lync Server 2010 Environment consisting of at least one Standard Edition Server or an Enterprise Edition Front End Pool and Lync clients.
  3. A Mitel 3300 ICP (IP Communications Platform) and Mitel handsets.
  4. A Mitel Live Business Gateway.
When approaching this kind of integration, you should have an engineer on hand familiar with the Mitel PBX so they can configure the 3300 ICP to work with the LBG and outbound/inbound digit modification on the LBG.

Configuring the Mitel Live Business Gateway

Now let’s take a look at the somewhat tricky part – configuring the LBG. Here’s where you’ll want to have your Mitel man at the ready to give you a hand, mainly in the configuration of the ICP side of things.

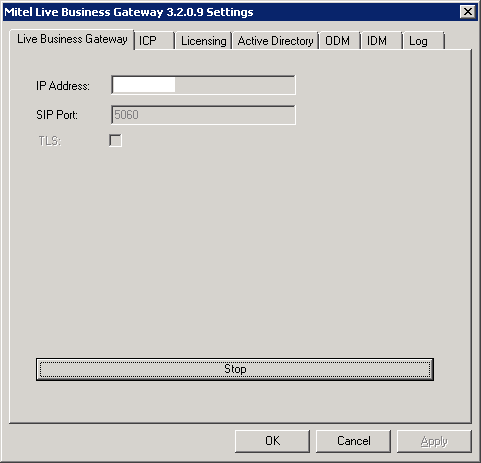
Firstly, open up Mitel Business Gateway from Control Panel. This tab will display the IP address of the machine and the SIP port the LBG will use. Unless you have a strict business requirement to encrypt internal communications, don’t select TLS (this is a big headache, involves lots of stress with certificate, something I’ll cover in another post).

Mitel Live Business Gateway

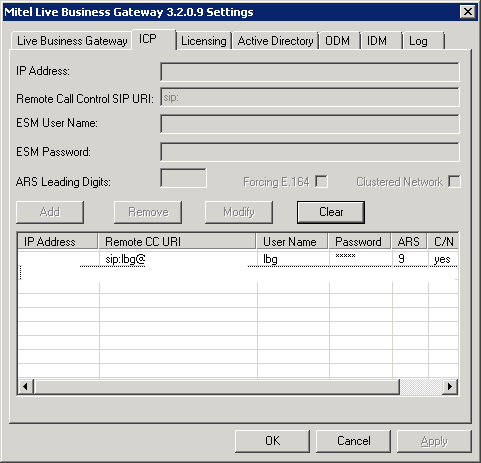
Next, click the ICP tab. Here’s where you specify the Mitel 3300 PBX nodes (aka ICPs) that the LBG will talk to.

Mitel Live Business Gateway - ICP

Specify the IP address of the ICP and the Remote CC URI (this is what will become your Line Server URI in Lync – should be something like lbg@hostname.domain.com) to use. Next, specify the username and password to connect to the Mitel 3300 and hit Add.

Next click the Licensing tab. Here you need to put in your Service Link ID from Mitel to license your users for RCC using the LBG.

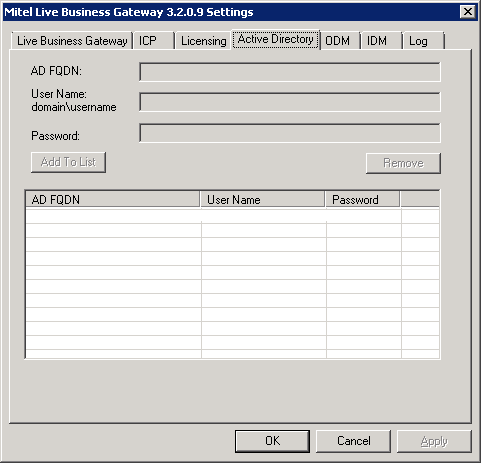
Now click the Active Directory tab. You need to configure the LBG to talk to AD so it can check if users are setup with phone numbers that they are attempting to remotely control with Lync.

Mitel Live Business Gateway - Active Directory

Specify the FQDN of a domain controller, then the username you want to use to query AD and the password and click Add To List. You can add additional DCs for redundancy.

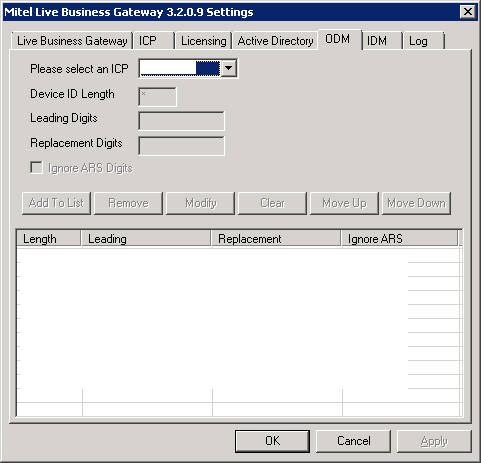
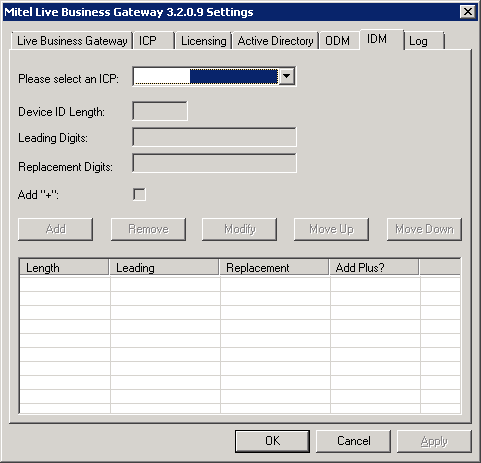
Under the ODM and IDM tabs, you can configure how numbers are modified on outbound and inbound calls (so you can normalise incoming numbers from, for example only 4 digit extensions to full E.164 so they match to AD user accounts).

Mitel Live Business Gateway - ODM

Mitel Live Business Gateway - IDM

Finally, on the Log tab, you can setup the log level that will be captured for diagnosis purposes.

Once you’re all done, return to the Live Business Gateway tab and click the button at the button labelled Start.

Configure Lync Server for Remote Call Control

As I mentioned above, configuring the Lync server infrastructure for RCC is a bit different from previous versions. Everything is done in Powershell now, so those familiar with Routing and Authorised Hosts tabs in the OCS 2007 R2 GUI will need to pay attention here.

Setting up routes and trusted applications

To configure remote call control with Mitel, the following Powershell cmdlets will be run using Lync Server Management Shell on the Lync Front End server. Replace server FQDNs and IP addresses with your own.

  1. Create a new Trusted Application Pool for the Mitel LBG.
    New-CsTrustedApplicationPool -Identity mitel-lbg.justin-morris.net -Registrar lyncfe.justin-morris.net -Site 1 -TreatAsAuthenticated $true -ThrottleAsServer $true -RequiresReplication $false
  2. Create a new Trusted Application which is bound to the Application Pool created in the previous step.
    New-CsTrustedApplication -ApplicationId RCC -TrustedApplicationPoolFqdn mitel-lbg.justin-morris.net -Port 5060 –EnableTcp
  3. Create a variable called $tcpRoute that defines the static route to the IP address of the Mitel LBG when the Server URI is matched.
    $tcpRoute = New-CsStaticRoute -TCPRoute -Destination 10.1.10.50 -Port 5060 -MatchUri mitel-lbg.justin-morris.net
  4. Configure the Lync Static Routing Configuration with the new route specified in the previous step.
    Set-CsStaticRoutingConfiguration -Route @{Add=$tcpRoute}
  5. Enable the modified Lync Server Topology.
    Enable-CsTopology
  6. The topology will then need to be exported to XML and a manual workaround applied specific to integration with Mitel. Note that this is NOT RECOMMENDED by Microsoft to EVER manually modify the topology document, but it is required to get RCC working with Mitel in Lync. Test this in an isolated environment before making changes to your production environment.
    Run the following command to export the topology to XML:
    Get-CsTopology -AsXml | Out-File c:\rcc.xml
  7. Open the rcc.xml document and find the line that refers to the Mitel LBG e.g.
    <Cluster Fqdn=”mitel-lbg.justin-morris.net” RequiresReplication=”false” RequiresSetup=”true”>
    <ClusterId SiteId=”1″ Number=”3″ /> <Machine OrdinalInCluster=”1″ Fqdn=”mitel-lbg.justin-morris.net”>
    <NetInterface InterfaceSide=”Primary” InterfaceNumber=”1″ IPAddress=”0
    .0.0.0” />
    </Machine> </Cluster>
  8. Modify the IPAddress field from 0.0.0.0 to the actual IP address of the Mitel LBG e.g. 10.1.10.50.
  9. Save the file and exit.
  10. Next, publish the modified Lync Server Topology to the CMS.
    Publish-CsTopology -FileName c:\rcc.xml

User Configuration

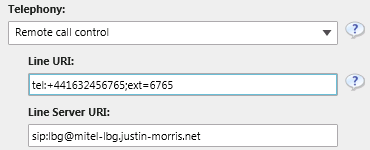
For each user you want to setup for RCC, go into their account details in the Lync Server Control Panel. From the Telephony drop-down menu, select Remote Call Control.

Configure them with a LineURI that looks like this:
tel:+441632456765;ext=6765

And a Line Server URI that looks like this:
sip:lbg@mitel-lbg.justin-morris.net

So in the GUI, it should look like this once configured:

RCC user configuration in Lync Server Control Panel

Once you’ve filled this in, hit Commit.

Additionally, each user needs to have the extension field (e.g. 6765) somewhere in their AD account (in a Telephone field for example) so the Mitel LBG can see that the users is setup for that phone number.

Configuring each Lync Front End Server to listen on Port 5060

Finally, we need to configure our Lync Front End Server to listen on port 5060 for SIP TCP so it can receive traffic from the Mitel LBG. We do this by running the following cmdlet from Lync Server Management Shell:

Set-CsRegistrar “Registrar:lyncfe.justin-morris.net” -SipServerTcpPort 5060

Hat tip to Tom Pacyk’s blog post for this one (again, the guy comes up with the goods).

Troubleshooting connectivity on the LBG

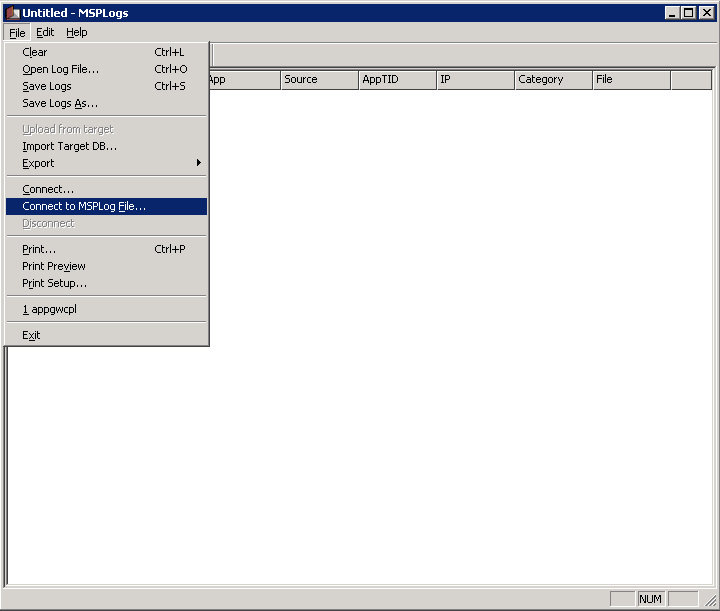
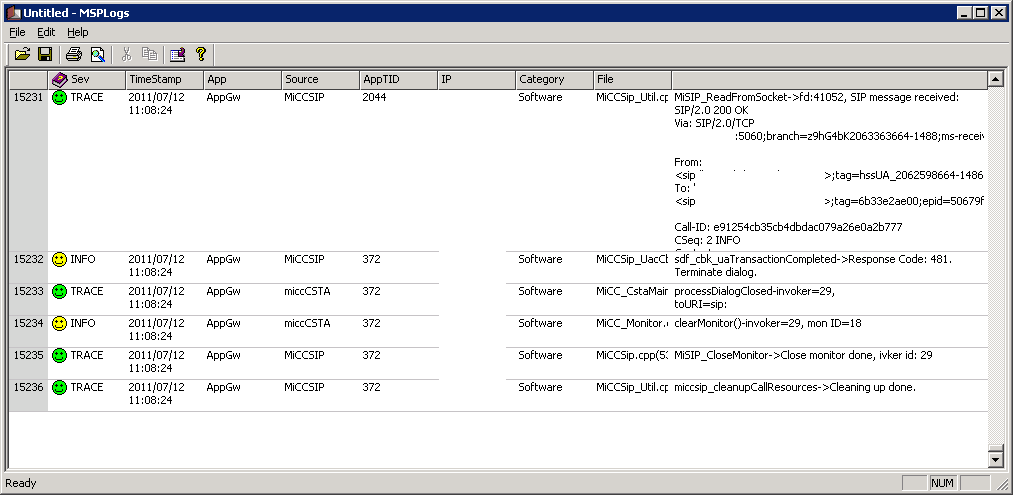
If RCC doesn’t work straight off the bat for you, you can troubleshoot connectivity by opening the Log Viewer application on the LBG. Navigate to C:\Program Files (x86)\Mitel Networks\Live Business Gateway\Tools and open MSPlogs.exe

First, click File then click Connect to MSPLog File…

Mitel LBG Log Viewer

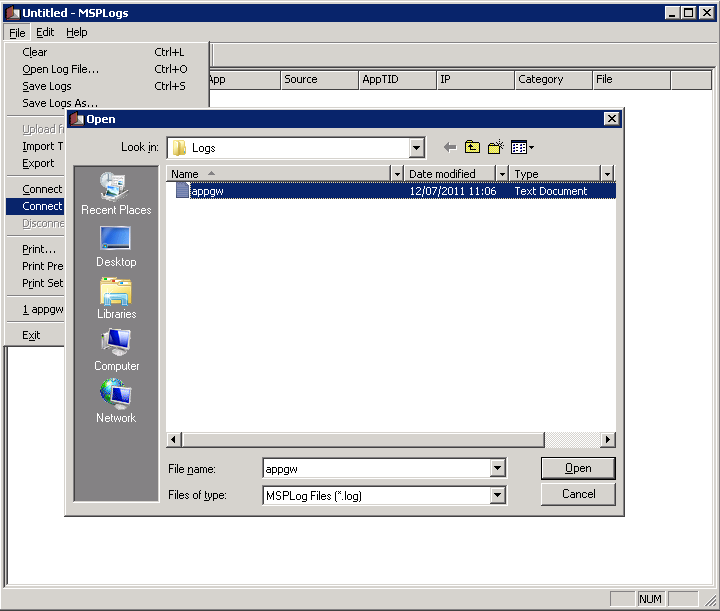
Next, navigate to the Logs directory under …\Mitel Networks\Live Business Gateway\Logs and select appgw.log and click Open.

Mitel LBG Log Viewer

All logs of connections to the LBG are now available for viewing. Interpreting what they mean is a topic for a whole other blog post. 🙂

Mitel LBG Log Viewer

Conclusion

Obviously this is a pretty full-on piece of integration, and this goes into a bit of detail but doesn’t cover everything. You’ll see less and less support of RCC these days and not as many people deploying it, but hopefully this helps those of you out there still wanting to get RCC going with your Mitel 3300 and Lync Server 2010.

How to hide users from the Lync Address Book

This has come up a few times in different engagements in the past, and I decided it would be worth publishing some guidance around how to set this up.

Why would I want to hide users?

Perhaps you have members of the organisation that you don’t want contacted by everybody else. Say if you have a strict communications policy that the CEO shouldn’t be directly contactable, you could hide them from appearing in the address book.

Another example is if you have resource accounts setup that are enabled for Lync whose purposes is for only making calls, there’s no need for these to be discoverable in the address book. Or perhaps you don’t want them searchable because they are private numbers or are in private areas, you would hide these from the Lync Address Book.

How it’s done

First, on one of your Lync Front End servers, install the Lync Server 2010 Resource Kit. You can download it here.

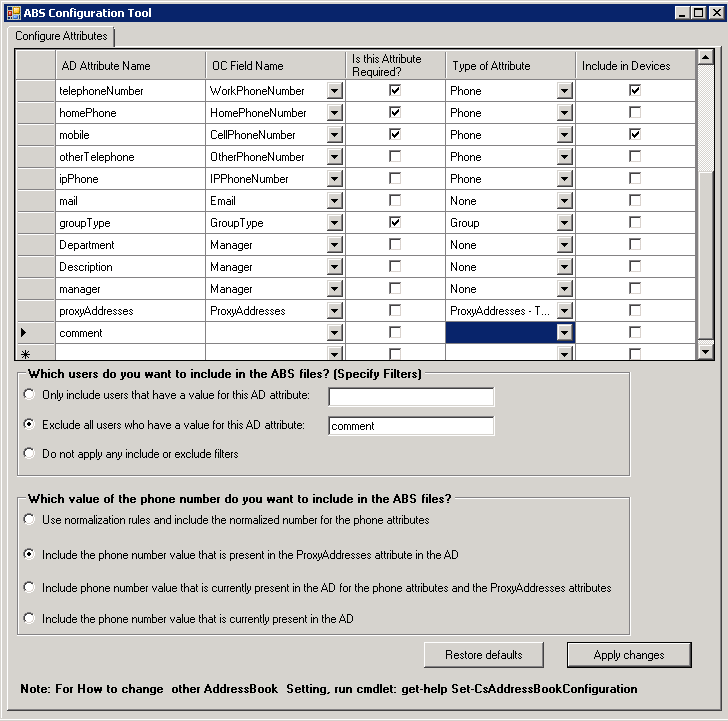
Next, on the server using Windows Explorer, browse to C:\Program Files\Microsoft Lync Server 2010\ResKit and double click the application named ABSConfig. You’ll be presented with the UI below.

Lync ABS Configuration Tool

Firstly, you’ll see a list of AD Attribute Names. To achieve this, we need to create a new one and specify the AD Attribute we want to use to filter accounts. Here I’ve specified the AD Attribute comment, but you can use whatever takes your fancy.

Next, you need to specify where it says Which users do you want to include in the ABS files? whether you want to:

  1. Only include users that have a value for the AD attribute you specify or;
  2. Exclude all users who have a value for the AD attribute you specify.

For this blog post, we’re going to select Exclude all users who have a value for this AD attribute. In the field next to this, we’re going to type the name of the AD attribute (comment) that we specified above. In each user account we want to hide, we will use this AD attribute to populate with a data value.

Once you’re done, hit Apply changes and you’re good to go. Changes will take affect next time the Address Book processes do their thing (by default, this happens at 1:30am each night).

Now, whenever the Lync User Replicator process sees a user with a value for the attribute you specified, it will exclude it from the Address Book and that user will not appear when you search for them in the Lync client.

Microsoft Lync, Group Chat, SQL Mirroring and Site Resilience

So the last few weeks I’ve been nutting out what happens when you deploy the backend Lync and Group Chat SQL databases onto a SQL Server 2008 R2 mirror pair for site resilience purposes. This is an unsupported scenario, so needless to say the results were quite fascinating.

I saw some very interesting behaviour when you simulated a failure of the primary SQL node and activated the standby node in another site. I also had to hack at it like crazy to try and get Lync to connect to the mirror node, both for the regular backend databases and for the Group Chat database.

Let me just whet your appetite by saying, some things work well, other things don’t work at all.
Database Mirroring in SQL I’ve learnt is actually a very robust and flexible HA solution for databases, but there are only some ways it could potentially be useful for Lync.

Standby for a full write up in the near future. 🙂

Communicator Web Access Observations in a Lync Environment

I’ve recently deployed Communicator Web Access into what was basically a greenfield environment (no previous versions of OCS or LCS) and came across some interesting stuff in the process.
Usually when you deploy CWA, you’ve already got an OCS 2007 R2 Standard Edition or Enterprise Edition pool deployed, and the CWA deployment goes in nice and easy. Throw Lync into the mix without any existing R2 infrastructure, and you get some interesting behaviour.

Environment Preparation

Prior to deploying our Lync environment or any CWA components, we need to update AD accordingly for OCS 2007 R2 first. I won’t go into the details here because Randy Wintle has already done a good job of it.

Once AD is good to go, we can start building the CWA server.

Want to use Web Enrolment? Think again

Because there is no existing OCS 2007 R2 infrastructure and no Admin Tools to run against it, we can’t use the Certificate Wizard. My next step was to try using the CA’s web enrolment tool to retrieve a certificate.

I attempted this, and could request and retrieve a certificate fine. However, when it came to assigning this certificate for CWA to use, the Deployment Wizard would throw back an error saying please use a valid certificate and wouldn’t let me proceed. There is however, an alternative method.

Using a Certificate Request Policy File

To get a certificate for CWA that it likes, we need to go deep on this one and create a Certificate Request Policy file. We will use this to create a Certificate Signing Request on the local computer which we can use to request a certificate from the CA. For the process below, you can download an example one here.

Instructions:

  1. Copy the certificate request policy file to the server. Make note of where you copy this to (e.g. C:\).
  2. Log onto the server corresponding to the filename. Open CMD and run the following command:
    Certreq –new C:\SERVERNAME.txt SERVERNAME_Out.txt
    (change the filename to whatever it is you’ve named the file and then give the _Out file any name you like).
  3. It will generate a SERVERNAME_Out.txt for each one you run. These are our CSR (certificate signing request) files that we will submit to the Web Enrolment Tool.
  4. Open up the CSR file in Notepad, copy the contents out and use it to request a certificate using the Web Enrolment tool. ADCS will spit out a certificate for you and it’ll work for CWA.

This can be a bit tricky, so let me know in the comments if you have any troubles or questions.

Server Activation

If you’re deploying CWA into a Greenfield environment with no previous versions of OCS, you must have at least one OCS 2007 R2 pool deployed. This is because during activation, the CWA Deployment Wizard looks for a valid pool in AD to list in the drop-down menu as the next hop. If there’s no pools present in AD, the Activation Wizard will fail.

So there’s a few things to think about and plan for when it comes to deploying CWA into your new Lync environment. Any questions or comments, drop them below.

The latest on Lync from TechEd 2011 North America

A presentation went up this afternoon (GMT+1) from TechEd 2011 NA by Kirk Gregersen titled Lync 2010 & the Future of Productivity. It’s about an hour long and covers a lot of content. It is somewhat high level, but there are a few things covered in this video that are well worth the watch (I’ve highlighted the super important ones in bold):

  • How the user experience is the key focus of the product group. It remains pretty high level for the first 10 minutes and includes a demo of Lync (focusing on contact card pervasiveness in Outlook, SharePoint etc).
  • Live demonstrations of:
    • The language translation app running on Silverlight.
    • The meeting schedule and join experience.
    • PowerPoint controls in a meeting, allowing a user to jump back and forth through slides.
    • The meeting recording experience.
  • Mobile client demos (32 minutes in) of Windows Phone 7 and iPhone.
  • Case study videos from LA Fitness, Commonwealth Bank of Australia and Herrenknecht.
  • More demos of application development and client extensibility:
    • IM and Expert including how questions are asked, how an expert provides data on their knowledge and the interaction that takes place between the question asker and the answerer via the bot on Lync.
  • A demo of Polycom multi-party video conference.
  • A brief overview of the Lync Roadmap for 2011.
    • US and UK pilot around online voice later in the year.
    • WP7, iPhone, Blackberry, Android, Nokia clients coming by end of calendar year.
  • A few words on the Skype purchase and what this means for Lync. “We (the Lync Product Group?) have been working on this as far back as January”.
    • Compares Lync to Skype, and how there is an interesting opportunity to marry the two via networks/federation.
    • The first public comments from the Lync team on the Skype integration.

You can view the presentation here. Some really exciting developments today, mostly around seeing the iPhone mobile client in action for the first time. Let’s hope we see Lync showcased some as TechEd NA rolls on.