Category Archives: Web Components

Extending existing Kerberos authentication to a new Lync Server 2013 deployment

Recently I was deploying Lync Server 2013 into an existing Lync Server 2010 environment that had Kerberos authentication configured for web services. Based on TechNet documentation, I was under the impression the new servers would take up the Kerberos account assignment automatically, but I was wrong.

We found that Lync 2013 failed to sign into the Lync Server 2013 pool. When we checked Fiddler, we were getting back an Unauthorised response from the Lync Server 2013 pool.

Synchronise the Kerberos Authentication Account to Lync Server 2013

After a deeper dig into TechNet (specifically the article Synchronize a Kerberos Authentication Account Password to IIS), I found that I needed to synchronise the existing Kerberos account from a Lync Server 2010 server to the new Lync Server 2013 Front End servers.

To do this, I ran this cmdlet to synchronise the Kerberos account from the 2010 pool to the 2013 server:

Set-CsKerberosAccountPassword -FromComputer 2010pool.contoso.com -ToComputer 2013fe1.contoso.com

I repeated this for each Lync Server 2013 Front End server just to cover all the bases.

Validation

Finally, I validated that the 2013 servers had the Kerberos account synchronised to them using the Test-CsKerberosAccountAssignment cmdlet from the TechNet article Test and Report Functional Readiness for Kerberos Authentication.

To do this, I ran the following cmdlet to generate a report that showed me that the 2013 servers had the account synchronised to them:

Test-CsKerberosAccountAssignment -Identity “site:UK” -Report “c:\logs\KerberosReport.htm” -Verbose

Once the report was generated, I opened it up to check that the new Lync Server 2013 Front End servers were listed and were marked as Successful.

When this process was completed, Lync 2013 successfully signed into the new Lync Server 2013 pool.

Microsoft Discontinues Some Forefront Security Products used by Lync

We knew this was coming for a while and had discussed this on The UC Architects Podcast recently, but Microsoft have finally made it official. The application most Lync Pros use to publish Lync’s web services externally, Forefront TMG 2010, is going the way of the ghost along with Microsoft’s OCS/Lync hygiene application – Forefront Security for OCS (FSOCS). Continue reading

Configuring Site Level Simple URLs in Lync Server 2010

Last month I deployed a new Lync 2010 environment with many regions/ pools globally coupled with multiple SIP domains of which we had to design a Meeting Join solution with simple URLs to accomodate the geographically dispersed nature. Let me set the scene.

The Problem

If we just had say, https://meet.contoso.com as our global meeting join URL (defined in the Lync Topology Builder) and pointed this to say, the EMEA Lync Front End pool, it would mean all users worldwide would be hitting that pool when they click the link in Outlook to join the meeting. Not ideal and not scalable.

The Solution

To ensure only EMEA users connect to the EMEA pool (and not the APAC users as well, for example), we need to create site level simple URLs to ensure users only connect to the pool in their region and that these URLs take precedence over the default global level simple URLs.

For this scenario, I selected Simple URL Naming Option 2 from the Planning for Simple URLs article on TechNet, which gives me a bit of flexibility and means my simple URLs for EMEA for this scenario look like this:

https://lyncemea.contoso.com/meet
https://lyncemea.fabrikam.com/meet
https://lyncemea.contoso.com/dialin

and my APAC URLs for example, would look like this:

https://lyncapac.contoso.com/meet
https://lyncapac.fabrikam.com/meet
https://lyncapac.contoso.com/dialin

and so on per global region. Note that you can only have one dialin simple URL per site – you can’t have a different dialin simple URL for each SIP domain.

For this article, I’ll only be covering the meet and dialin URLs, not the admin URL for LSCP access.

Creating a new Simple URL Configuration

First we need to create a new simple URL configuration that we will end up applying new simple URLs to.

  1. The first command we need to run is Get-CsSite. This cmdlet retrieves the list of Lync sites in the topology.
  2. After we’ve identified the site name (EMEA), we run the New-CsSimpleUrlConfiguration cmdlet against the site e.g.
    New-CsSimpleUrlConfiguration -Identity site:EMEA

Creating new Simple URLs

After we’ve created the new Simple URL configuration, we need to first create simple URL entries bound to a variable in our current PowerShell session and then simple URLs bound to a different variable.

Simple URL Entries

We run the following cmdlets to create a new simple URL entry for each URL required and then bind it to the variable specified at the start of the cmdlet.

$urlEntryContosoMeet = New-CsSimpleUrlEntry -url “https://lyncemea.contoso.com/meet

$urlEntryFabrikamMeet = New-CsSimpleUrlEntry -url “https://lyncemea.fabrikam.com/meet

$urlEntryAllDialIn = New-CsSimpleUrlEntry -url “https://lyncemea.contoso.com/dialin

Simple URLs

Next, we need to actually create the new simple URL in Lync, set which component (meet or dialin) it will apply to, which SIP domain it’s set for, which simple URL entry it will use and then (phew!) bind it to the variable we specify at the start of the cmdlet. Run each cmdlet per simple URL you need to create:

$simpleURLContosoMeet = New-CsSimpleUrl -Component meet -Domain contoso.com -ActiveUrl https://lyncemea.contoso.com/meet -simpleurl $urlEntryContosoMeet

$simpleURLFabrikamMeet = New-CsSimpleUrl -Component meet -Domain fabrikam.com –ActiveUrl https://lyncemea.fabrikam.com/meet -simpleurl $urlEntryFabrikamMeet

$simpleURLAllDialIn = New-CsSimpleUrl -Component dialin -Domain * -ActiveUrl https://lyncemea.contoso.com/dialin -simpleurl $urlEntryAllDialIn

Bringing it all together

So now we have a bunch of variables floating around in our current PowerShell session, we need to apply them to something. To make it real, we need to add the variables of all our simple URLs from the previous step to the new site level simple URL configuration we created earlier by running this cmdlet:

Set-CsSimpleUrlConfiguration -Identity “site:EMEA” -SimpleUrl @{Add=$simpleURLContosoMeet,$simpleURLFabrikamMeet,$simpleURLAllDialIn}

Once that’s applied successfully, we need to run Enable-CsComputer to apply the configuration to IIS on the Front End server/s in the pool.

To review the changes committed, run the cmdlet Get-CsSimpleUrlConfiguration to retrieve the Global Simple URL configuration and the new Site level Simple URL configuration, each with the individual URLs we created.

Last Words

Make sure you take note of the difference between a Simple URL entry and a Simple URL, as they are different things in Lync Server Management Shell that are brought together to create a configuration.

To reiterate, note that you can only have one dialin simple URL per site – you can’t have a different dialin simple URL for each SIP domain.

Hope this makes it (a bit) clear on how to setup site specific simple URLs in Lync. As Lync grows in maturity and market share, we will see larger, more widespread organisations adopting it which means you’ll need to know how to get this kind of configuration going. 🙂
Communicator Web Access Observations in a Lync Environment

I’ve recently deployed Communicator Web Access into what was basically a greenfield environment (no previous versions of OCS or LCS) and came across some interesting stuff in the process.
Usually when you deploy CWA, you’ve already got an OCS 2007 R2 Standard Edition or Enterprise Edition pool deployed, and the CWA deployment goes in nice and easy. Throw Lync into the mix without any existing R2 infrastructure, and you get some interesting behaviour.

Environment Preparation

Prior to deploying our Lync environment or any CWA components, we need to update AD accordingly for OCS 2007 R2 first. I won’t go into the details here because Randy Wintle has already done a good job of it.

Once AD is good to go, we can start building the CWA server.

Want to use Web Enrolment? Think again

Because there is no existing OCS 2007 R2 infrastructure and no Admin Tools to run against it, we can’t use the Certificate Wizard. My next step was to try using the CA’s web enrolment tool to retrieve a certificate.

I attempted this, and could request and retrieve a certificate fine. However, when it came to assigning this certificate for CWA to use, the Deployment Wizard would throw back an error saying please use a valid certificate and wouldn’t let me proceed. There is however, an alternative method.

Using a Certificate Request Policy File

To get a certificate for CWA that it likes, we need to go deep on this one and create a Certificate Request Policy file. We will use this to create a Certificate Signing Request on the local computer which we can use to request a certificate from the CA. For the process below, you can download an example one here.

Instructions:

  1. Copy the certificate request policy file to the server. Make note of where you copy this to (e.g. C:\).
  2. Log onto the server corresponding to the filename. Open CMD and run the following command:
    Certreq –new C:\SERVERNAME.txt SERVERNAME_Out.txt
    (change the filename to whatever it is you’ve named the file and then give the _Out file any name you like).
  3. It will generate a SERVERNAME_Out.txt for each one you run. These are our CSR (certificate signing request) files that we will submit to the Web Enrolment Tool.
  4. Open up the CSR file in Notepad, copy the contents out and use it to request a certificate using the Web Enrolment tool. ADCS will spit out a certificate for you and it’ll work for CWA.

This can be a bit tricky, so let me know in the comments if you have any troubles or questions.

Server Activation

If you’re deploying CWA into a Greenfield environment with no previous versions of OCS, you must have at least one OCS 2007 R2 pool deployed. This is because during activation, the CWA Deployment Wizard looks for a valid pool in AD to list in the drop-down menu as the next hop. If there’s no pools present in AD, the Activation Wizard will fail.

So there’s a few things to think about and plan for when it comes to deploying CWA into your new Lync environment. Any questions or comments, drop them below.

Microsoft Lync Server 2010 Web Scheduler Released

This is great news and benefits me personally because I use Communicator for Mac and don’t have the Online Meeting Add-In for Outlook. What this now enables is a web-based way of scheduling and managing your meetings using Lync (which was available in OCS 2007 R2). It allows you to do the following:

  • Schedule a new online Lync meeting.
  • List all existing Lync Server 2010 meetings that you’ve organised.
  • View and modify details of an existing meeting.
  • Delete an existing meeting.
  • Send an email invitation to meeting participants by using a configured SMTP mail server.
  • Join an existing conference.

if we compare this to what the Online Meeting Add-In for Outlook can do, here’s where the shortcomings are:

  • Lync Web Scheduler does not support scheduling recurring meetings.
  • Lync Web Scheduler lists only meetings that were organized by the user. It does not list all meetings that the user is invited to. Further, meetings created using some other tool will not be editable using Lync Web Scheduler.
  • Lync Web Scheduler is available only in English.
  • Meeting invitations that are generated by Lync Web Scheduler do not look exactly the same as those that are generated by the Online Meeting Add-In for Outlook.
  • Lync Web Scheduler doesn’t interact with the calendaring server. Calendar updates happen only via email invitations.

The download is available here. Install is pretty quick and simple, and it installs as a virtual directory onto IIS on your Lync Front End server. Note that if you have multiple front end servers as part of a pool, you’ll need to install the Web Scheduler on each front end server.

Once it’s installed, you’ll need to setup an SMTP server for it to use to send out meeting invites. This is covered in the Readme file so I won’t reinvent the wheel.

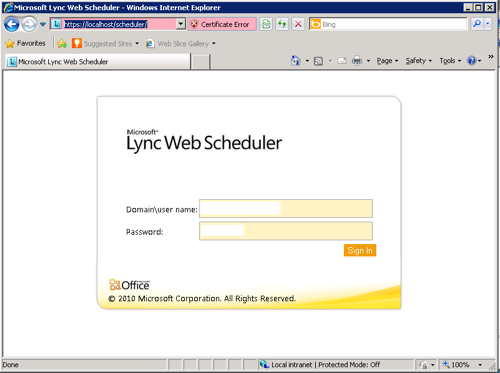
To access the Web Scheduler itself, navigate to https://YourPoolWebFQDN/scheduler (e.g. https://lyncweb.domain.com/scheduler) and authenticate, which looks like this:

Lync Web Scheduler Login

Make sure you use your Web URL, not your Pool URL if you have a DNS load balanced pool. Otherwise you’ll see nothing but a blank screen after login.

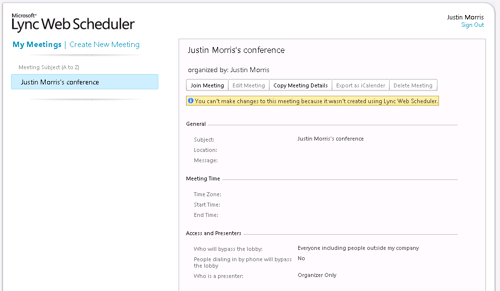
Once you’ve logged in, you’ll be presented with the Lync Web Scheduler. From here you can view your current meetings and also create new ones, as illustrated below:

Lync Web Scheduler

Pretty easy huh? Now go forth and deploy and get your Mac and web-based clients scheduling meetings on Lync!